
.png)


.png)
.jpg)


The second step for obtaining your verified blue Gmail checkmark will consist of you uploading your company logo in a specific SVG format to your public server and securing a trademark for your logo.
The process for creating a BIMI-compliant SVG logo includes multiple technical and design steps that might require the assistance of a specialist.
Obtaining a trademark includes researching existing trademarks to ensure that your logo is unique, filing a trademark application with the appropriate government agency, and then waiting for the trademark to be approved.
Latest news: The BIMI standard currently requires a registered trademark for your logo to be eligible for a Verified Mark Certificate (VMC). However, the standard will soon be expanded to include logos that are not trademarked.
Here’s a short breakdown of the 2 steps:
Obtaining & Configuring Your Company's Logo SVG
- Understanding what an SVG is
- Determining if your company logo is already in SVG format
- Converting your logo to an SVG format if needed
- Creating a BIMI-compliant SVG logo
Trademarking Your Logo
- Understanding what a logo trademark is
- Applying for a logo trademark
- Understanding the timeline for trademark registration
- Working with a reputable company to get your logo trademarked
Step 1 - Obtaining & Configuring Your Company's Logo SVG
Understanding what an SVG file is:
SVG stands for Scalable Vector Graphics. Imagine a picture you can zoom in on indefinitely without it ever getting blurry, and that's essentially what an SVG is.
This means no matter how much you increase the size of an SVG, it will always look sharp and clear because it stores the image via mathematical formulas and does not stretch pixels.
Here are some of the most popular software programs for creating SVG graphics:
- Adobe Illustrator
- Figma
- Sketch
- Inkscape
Example of increasing the size of an SVG logo that scales perfectly:
.gif)
Determining if your company logo is already in SVG format:
To find out if your company logo is already in SVG format, start by checking where your digital assets are stored. This could be on your company server, a cloud storage platform, or even an email thread from when the logo was first created. The SVG file will end with the extension ".svg" in the filename.
If you're unsure, you can also ask your design team, the design agency, or freelancer who originally created your logo, or the person responsible for your company's branding. Any of these sources may still have the original design files and can provide you with the SVG if it was created. It's important to maintain an SVG version of your logo, as it provides flexibility and scalability for different digital applications.
SVG file requirements and recommendations
To ensure that your logo is verified and can be displayed properly at various resolutions, it must meet BIMI's brand logo requirements. This ensures that your logo passes security checks and can be displayed accurately.
In order to be properly displayed in the recipient's inbox, your SVG file must adhere to certain specifications.
- It must be in SVG Tiny Portable/Secure (SVG Tiny PS) format
- baseProfile attribute of tiny-ps
- version attribute of 1.2
- The <title> element should reflect your organization's name
- The logo should not include external links or references, scripts, animations, or interactive elements.
- The <svg> root element should not include x= or y= attributes.
- To ensure compatibility with email clients that support BIMI, the logo should be centered in a square on a solid color background, have a small file size of no larger than 32 KB, and include a <desc> element for accessibility.
Creating your Brand Logo SVG file - Step by Step Guide
Converting your logo to an SVG format
If your company logo isn't already in SVG format, you'll need to convert it. This process should ideally be carried out by a professional graphic designer to ensure the quality and accuracy of your logo are maintained.
If you're unsure how to proceed, get in touch with our team so we can help!
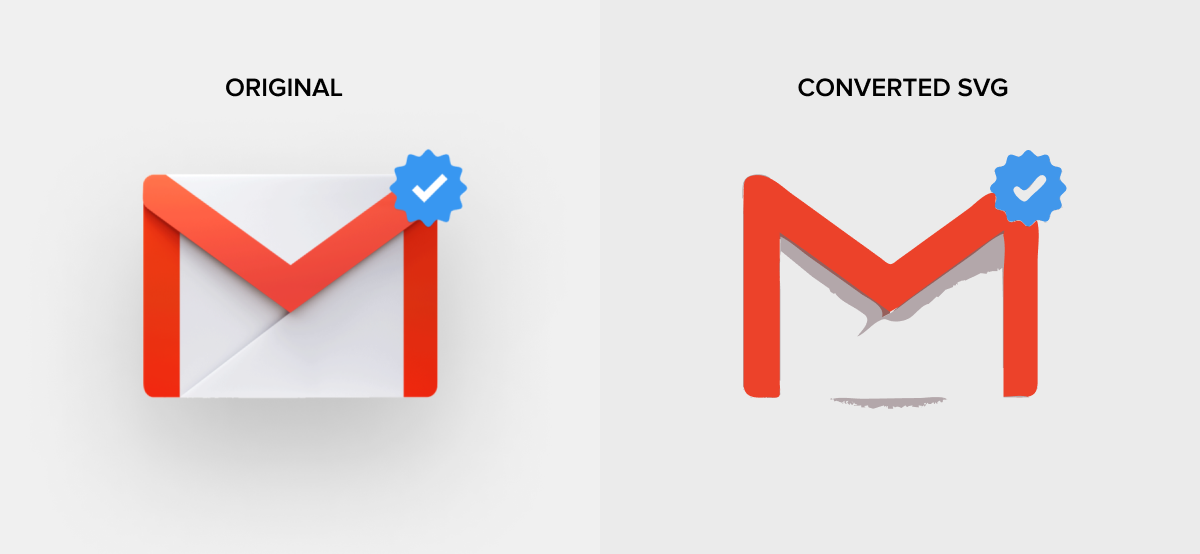
It is possible to find online tools that claim to automatically convert JPG files to SVG format. However, we strongly advise against using these tools, as the results are usually poor and inaccurate. Here’s an example of a logo that has been automatically converted:
Tips for better results:
- Optimal image presentation is achieved with a square aspect ratio (1:1).
- It's recommended that the image be positioned in the center to ensure ideal visibility in various shapes such as a square, a rounded square, or a circle.
- Using non-transparent backgrounds is advisable due to the inconsistent and unpredictable display outcomes with transparent backgrounds.
Your logo will display in different size and forms, so it’s important to consider that when designing your logo:
.png)
Make sure your logo is 80px by 80px and that it has padding around it. This ensures that any cropping in different shapes doesn’t affect the design:
.png)
Currently, there are no tools available that can create an SVG format file suitable for BIMI that meets all the requirements. Typically, SVG files for BIMI need to be modified manually using a text editor or a special-purpose script.
Here is a useful tool provided by the BIMI organization to help you convert your SVG 1.2 to the SVG P/S format:
https://bimigroup.org/svg-conversion-tools-released/
To obtain a Verified Checkmark, you must have a company logo in a BIMI-compliant SVG format and a trademark for your logo. The logo must be based on the Scalable Vector Graphic (SVG) Tiny 1.2 format specified by the W3C, with fewer allowed elements, and in "SVG Tiny Portable/Secure" (SVG P/S) format supported by BIMI.
Step-by-step guide on how to create your SVG file using Adobe Illustrator:

1. Launch Adobe Illustrator and open your original vector image.
2. Ensure that your vector image doesn't contain bitmaps, external file links, text, or grouped objects. If you have text to preserve as a shape, use the 'Create outlines' option in Illustrator.
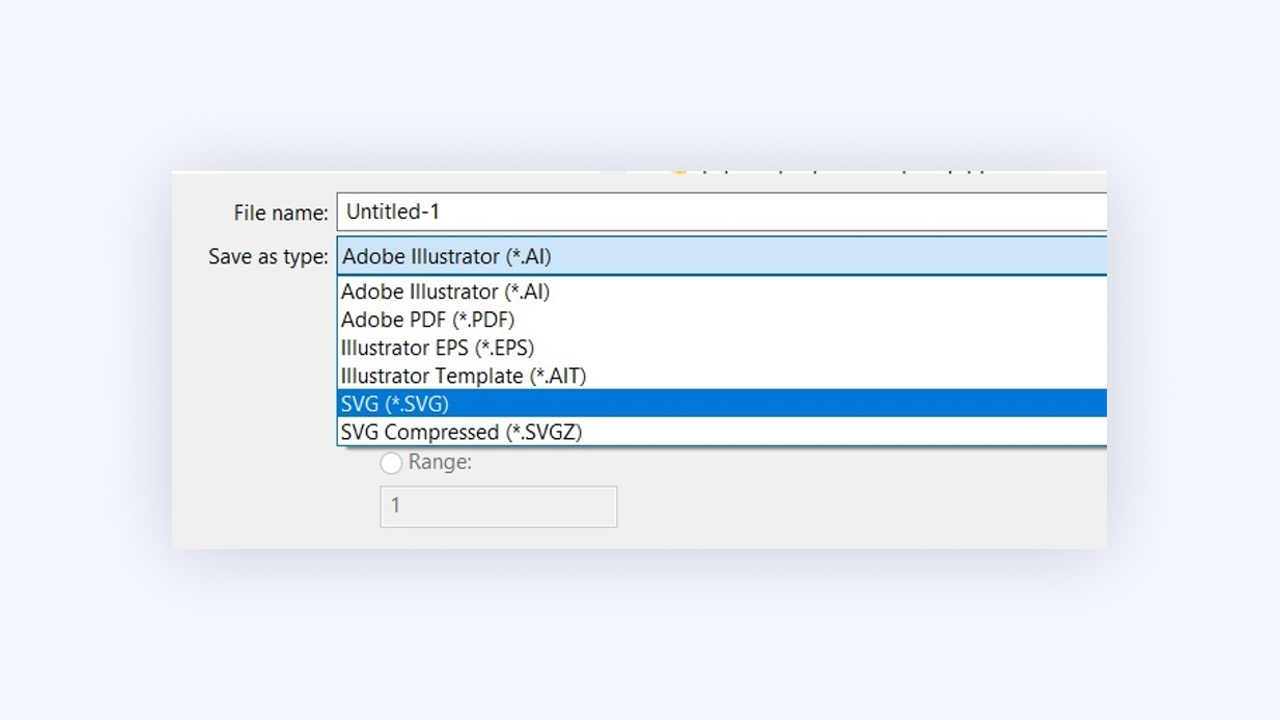
3. Click on 'File' and choose 'Save As…'.
4. In the 'Save As' dialog:
- Type the desired filename in the 'Save As' field. Stick to lowercase letters and hyphens, for instance: mybusiness-bimi.svg. Avoid using special characters.
- In the 'Format' drop down menu, choose 'SVG (svg)'. Do not select 'SVG Compressed (svgz)'.
- Hit the 'Save' button
5. In the resulting 'SVG Options' dialog:
- In the 'SVG Profiles' dropdown, choose 'SVG Tiny 1.2'.
- In 'Image Location', opt for 'Preserve'.
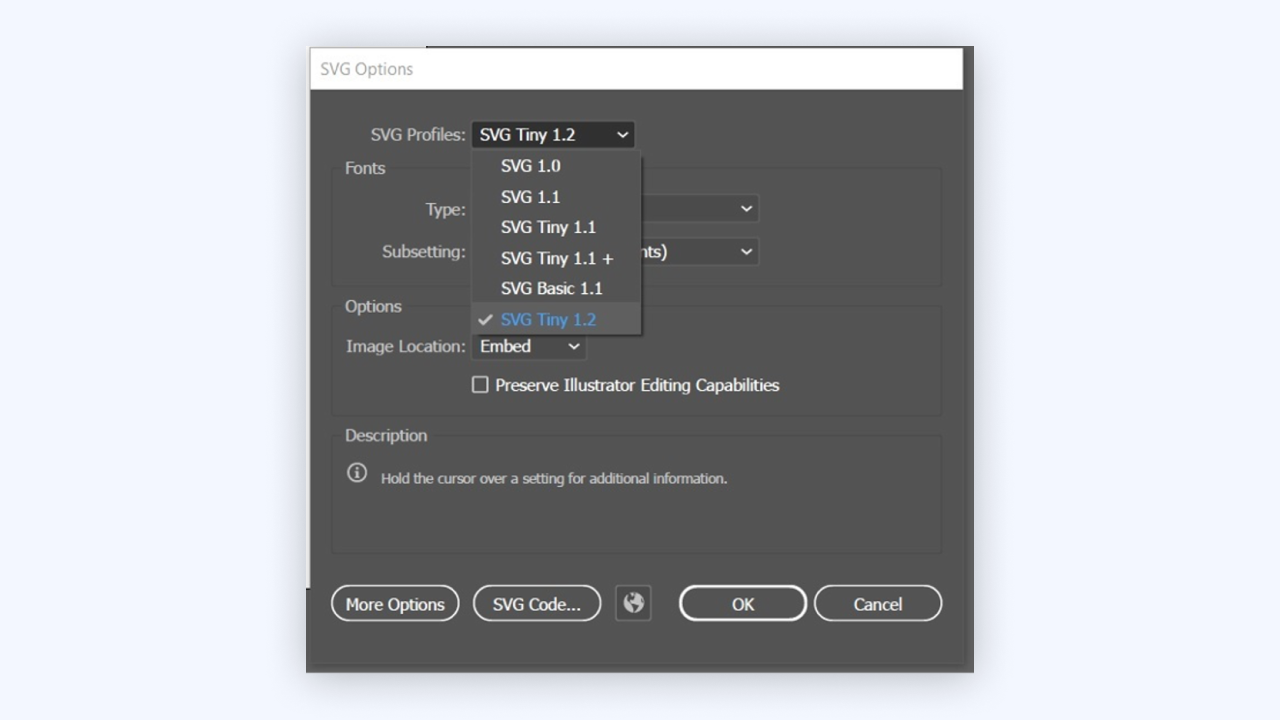
6. Click 'OK' to finalize saving the file.
7. Open the file in a text editor like Text Edit on MacOS. You will be editing the first part of the file, which should look like this:
8. Change these items the text file:
- svg version value is 1.2. If it’s not, change it to 1.2.
- base Profile value to tiny-ps.
- x and y attributes and values.
- Add a <title> tag and value as shown in the example in Step 7. The title must come after <svg and before <g>.
9. Once you’re done, verify that the first part of the file appears similar to this:
10. Save your changes to the text file. The file extension must be .svg.
Next, upload the SVG file to your domain’s public web server.
Uploading the SVG file to your public web server
Once your SVG file is ready, the next step is to upload it to your public web server. The exact process may vary depending on your web hosting service, but generally, you would use an FTP (File Transfer Protocol) client or your hosting service's file manager.
In the FTP client or file manager, navigate to the root directory or the desired location where you want to store the SVG file.
Next, locate the SVG file on your local machine and select 'Upload' to transfer it to the server. Make sure the file permissions are set correctly so that it's publicly accessible.
Lastly, verify that the file can be viewed in a web browser by typing the file's URL directly into the browser's address bar. If everything is set up correctly, your SVG logo should now be visible and ready for use on the internet.
The web server must be in the same domain as your outgoing email server. This is the specific area where you enable BIMI. You can do this by adhering to the instructions provided in the Add a BIMI TXT record section, specifically designed for your domain provider.
Your web server should share the same domain as your outgoing email server. This is the specific domain where you will activate BIMI once all the steps have been completed.
Step 2 - Trademarking Your Logo
Securing a Verified Mark Certificate (VMC) is crucial. A VMC is a digital certificate given by a certificate authority, serving as proof of your logo's ownership. To qualify for a VMC, your logo must already be a registered trademark.
Latest news: Google has announced changes are underway as the standard is set to broaden its scope to accommodate logos that lack trademark registration.
Understand what a Logo Trademark is
A logo trademark is a legally recognized and protected design or symbol that distinguishes a company's products or services from those of other entities. It serves as a unique identifier of the company's brand, enhancing its recognizability and establishing trust with customers.
Once a logo is trademarked, it means the company has exclusive rights to use it in relation to its goods or services. Any unauthorized use by other parties can be legally challenged, preventing potential confusion in the marketplace. This protection typically extends to similar logos that could potentially be mistaken for the trademarked logo, depending on the laws of the specific jurisdiction. Trademarking a logo is a critical step in safeguarding a company's brand identity.
Before applying for your Logo Trademark
Before applying for a VMC, verify that your logo is a registered trademark on the World Intellectual Property Organization’s (WIPO) Global Brand Database, which provides information on active registered trademarks.
How to Apply for your Logo Trademark for your VMC Certificate
- Conduct a Trademark Search: As a company with a logo and SVG file ready, your first step is to conduct a thorough trademark search. This ensures that your logo does not infringe upon any existing trademarks. Online resources such as the United States Patent and Trademark Office's (USPTO) Trademark Electronic Search System (TESS) can be used to start your search.
- Prepare and Submit Your Application: Following the verification of your logo's uniqueness, compile all the necessary information about your logo and the goods or services it represents. You can typically submit your application online via the trademark office's website of your country. It is important to verify if your country is recognized by the major VMC issuers. Please contact Entrust to make sure you are registering your logo in the right country.
- Cost and Turnaround Time: Costs of logo trademark application vary depending on the country. In the U.S., it usually ranges from $225 to $400 per class of goods or services. In the UK, it's approximately £200, while in Australia, it's about $250 AUD. Keep in mind that your business might span multiple classes, which will necessitate separate fees for each. The turnaround time also varies, usually ranging from several months to more than a year, based on factors such as logo complexity, objections, and more.
- Respond to Correspondences: If the trademark office contacts you regarding your application, make sure to respond promptly to prevent your application from being abandoned.
- Trademark Approval and Maintenance: Upon approval, you'll receive a certificate of registration. To maintain your trademark rights, you need to continuously use your logo in commerce and file the required maintenance documents as dictated by your country's trademark office.
- Apply for a VMC: With a registered logo trademark, you're now eligible to apply for a Verified Mark Certificate (VMC). This digital certificate, issued by a certificate authority, verifies your legal ownership of the logo.
Timeline for a Logo Trademark Application
The duration it takes to complete a logo registration can vary greatly from one country to another, primarily due to the unique processes, rules, and resources of the respective trademark offices. For instance, in the United States, the process can take anywhere from 8 to 10 months, given no oppositions or queries are raised. The United Kingdom's Intellectual Property Office typically completes the process within 4 months if no objections are raised. In Australia, the trademark registration process generally takes approximately 7.5 months.
However, in India, the process could stretch up to 18-24 months due to the volume of applications and the multi-step process. In the European Union, trademark registration with the EUIPO can take about 5-6 months. Please remember these are approximate durations and actual times may vary depending on a variety of factors including the complexity of your logo, the efficiency of the trademark office, and any objections that might be raised. Always check with your local trademark office for the most accurate information.
Cost of Obtaining Your Logo Trademark
Below is a table that illustrates the cost of obtaining a logo trademark in several major countries around the world. The costs are provided in their respective local currencies:
These figures are based on basic filing fees and can vary depending on a range of factors, such as the number of classes under which you want to register your logo and the specifics of your application. Please check with your local trademark office or a legal professional for the most accurate and current information.
Seems like a lot to do on your own?
We understand this trademarking process can seem like a lot. If you would like us to help, simply Contact us so we can help you through the next steps for obtaining your SVG and trademark.
